Saturday, September 27, 2014

Artfully Sent Card

Oh My Goodness! - how easy and FUN is cardmaking with Close To My Heart's new Artfully Sent Cricut Collection - in 3 simple steps - cut, paste and embellish... I created a card in no time at all.

I started with this little collection of cardstock pieces and a small rectangle of gold coloured paper, cut from the Brown & Tan Glitter Paper Pack.


I prepared the flower shapes first, by sponging with Glacier Ink... rolling them with the Quilling Tool and adhering together with Liquid Glass. Next I scored the leaf shapes with the Bone Folder. This all took about 5 minutes and was the most time consuming part of making the card LOL!


The Thank You sentiment is from one of the stamp sets that comes with the Artfully Sent Cricut Collection and to keep with the gold tones I stamped it in Desert Sand Ink. I love how interactive you can make the cards with this Cricut Collection... it makes them just that little more special. This birdcage shaped card stands up beautifully on it's rounded legs and when you open it up you get a full view of the sweet gilded bird.


There are 6 different functions on the Artfully Sent Cricut Cartridge and each has a unique interactive feature - you can choose from:
  • Pop-up cards
  • Icon cards
  • Scene cards
  • Sentiment cards
  • Sleeve cards
  • Pocket cards
Together these functions include 700 images that co-ordinate to create 400 complete projects. However, add your own creative flair and the possibilities are endless. To add this cardmaking "must-have" to your craft room simply click here to place your order in my Online Shop....and if you are needing more inspiration be sure to pop back during the week when I will share some more of my Artfully Sent creations.
 

Friday, September 26, 2014

Friday Friend Feature #4

Welcome to Friday Friend Feature No. 4 -  each Friday on my blog I have been featuring art work created by my Crafty Friends using Close To My Heart products. The art work comes to you from consultants in my team, paper craft designer friends and others from my circle of scrapping and card making buddies – all have amazing talents and a love for all that is crafty… and I know they have been inspiring you to use these wonderful products in ways you never would have imagined.
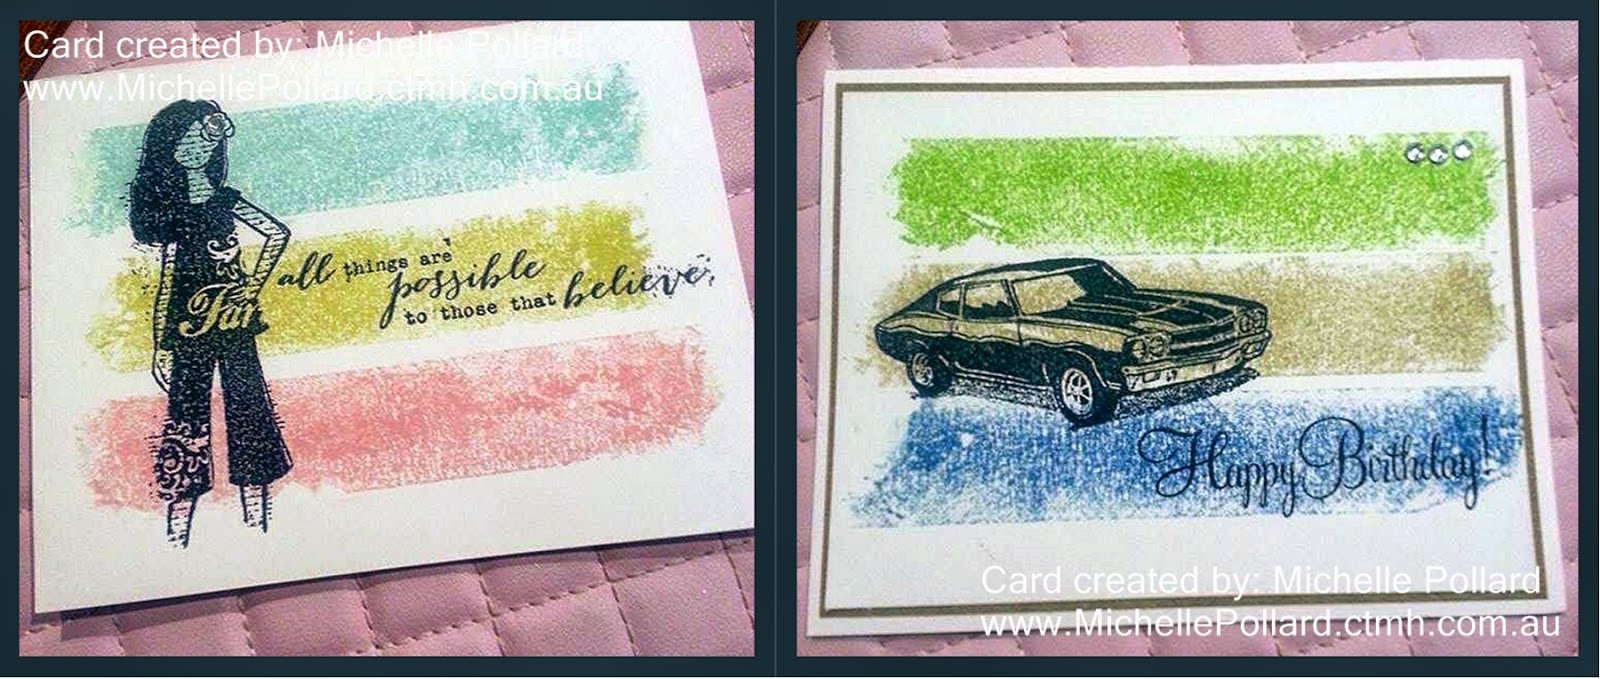
The cards I am featuring today were made by Michelle - a very dear friend and consultant in my team of Crafty Chicks. Michelle's cards showcase the "masking tape" technique... which is very much on trend in the card making world at the moment. Michelle describes it as a "simple yet effective technique" and as you can see the stamped images make a huge impact when showcased in this way.
Michelle has used the Dreamer and Maximum Power stamp sets along with the Happy Birthday sentiment from the Cricut Art Philosophy Collection on these cards. The Dreamer card features 3 of the new ink colours in the Whimsy Colour Palette - Glacier, Flaxen and  Pixie....while the Happy Birthday card uses Pear, Cashmere and Indian Corn Blue. You can check out the full range of exclusive ink colours in the Close To My Heart range here in my Online Shop with 42 co-ordinating colours to choose from, there are so many combinations you can use to create these simple but stunning style of cards. If you would like to learn some fun techniques for your paper craft projects join us for a Crafty Day Out - you are always welcome.

Have a great weekend and don't forget to leave Michelle a message in the comments section below - I love hearing your thoughts on the art work showcased on my blog.

Monday, September 22, 2014

Pretty Petals

I've just spent the most wonderful 3 day weekend playing and sharing all things crafty with my Close To My Heart community of friends - we inked and embossed up a storm....and as quoted by one friend - had the "most funest time ever"!

This is one of my cards from the weekend combining both wet and dry embossing techniques, some ink play and a lovely floral stamp set called Pretty Petals - which is also one of our Cricut compatible stamp sets.

 The glossy black flower was created with Black Pigment ink and Clear Embossing Powder. The flower image had been stamped onto some white cardstock I had customised earlier with Pixie and Canary ink. To create this unique patterned paper I smeared the 2 colours of ink onto my All Purpose Mat then spritzed with water and salt, which in turned created a nice spotty effect.... it is also the salt that gives the embossed flower it's glittery appearance. I LOVE playing with my inks to produce these special effects and I'd love to show you how too! - simply contact me at lotfam@iinet.net.au to book your own creative playtime session.
 
I used the Score Board to create the dry-embossed waffle pattern on the Canary and Hollyhock  - the 1/8" score increments on the board can be used in various combinations simply by using the Scoring Tool (included with the board) to make linear patterns.
 
 
The card design was finished off with a thin sliver of Black Shimmer Trim on top of a border created with the Scallop Border Punch and some faux stitching using the Black Journalling Pen.
 
Thanks for stopping by my blog today - I hope you have had a wonderful Monday and I'll be back during the week with some more Close To My Heart goodness to share with you.


Friday, September 19, 2014

Friday Friend Feature #3


Today is the 3rd instalment of my Friday Friend Feature…each and every Friday I will be featuring art work created by my Crafty Friends using Close To My Heart products. This art work will be created by consultants in my team, paper craft designer friends and others from my circle of scrapping and card making buddies – all have amazing talents and a love for all that is crafty… I know they will inspire you to use these wonderful products in ways you never would have imagined.

Today’s sweet crafting comes from one of my online designer friends Alicia who creates... simply, because it makes her happy. Alicia and I belong to an online crafting community and her card making is very inspiring. Alicia is sharing a set of 3 delightful cards featuring one of our Hostess Reward Stamp Sets called Sweet As Sugar.
After earning Hostess Rewards at your qualifying gathering you can "treat" yourself to some discounted stamp sets making your hostess credit stretch even further. The Sweet As Sugar set features 12 images and would normally retail for $27 however, as a Hostess Reward you can purchase it for only $14!!....take a look at what Alicia has created using this set....her cards are certainly very sweet!!
The "lolly jar" images were stamped on a combination of papers from the Brushed Paper Pack and the Paper Fundamentals Whimsy Assortment. Although there are images included in this set to fill the jars, Alicia chose to use a mixture of embellishments instead - very cute and clever!

The Embellishments featured on this card are all available in my Online Shop and include some of my favourites Red Enamel Hearts, White Enamel Stars and puffy pink hearts from the Chalk It Up Assortment. Alicia's card bases were taken from the Daisy White Value Pack - 50 x  5 1/2" X 4 1/4" cards for $20....not only are they exceptional value but they are a great time saver for card makers.
If you would like to host a gathering and add this stamp set to your collection please send me a message at lotfam@iinet.net.au I'd love to help you earn discounted craft goodies! I'm also happy to announce that Alicia will be sharing her designs with us on a regular basis  and I would love you to leave some love & a message for her in the comments section below... and don't forget to check back next Friday for the 4th instalment of my Friday Friend Feature.
What ever this weekend has in store for you I hope you get to enjoy some crafting time!


Tuesday, September 16, 2014

Creating Backgrounds

Today, I wanted to share a card using another fun & easy background technique using Close To My Heart ReInkers. This month my creative classes and workshop events have included all sorts of different ways to add a touch of uniqueness to your projects... and this theme will be carried through to the workshops I am tutoring at this weekend in Melbourne - if you would like to attend these events? - check my Facebook Page for more information.


The background was dry brushed with Thistle, Canary and Pixie reinkers - since their release last month, these colours have become a firm favourite of mine. The metal flowers in the Brushed Assortment are very much a favourite too and have been my September Feature Product. The flowers are self adhesive and embellished with some silver bling gems in the centre. However, I removed the bling gems and replaced them with Black Epoxy Bubbles... just so they co-ordinated with the other black elements featured on the card.

...and to let you in on a little secret... the 2 pieces of patterned cardstock (from the Paper Fundamentals Whimsy Assortment) that the sentiment was mounted onto, are actually  scraps! I was cutting photo frames from the Cricut Artbooking Collection and these little pieces were the centre cut outs...I thought they were perfect to save and use for card embellishments and they already had rounded corners - pretty cool!!
 
I can't wait to experiment with the negatives and cut-outs from the new Artfully Sent Cricut Collection - with so many interactive card components such as pop-ups, scenes,  sleeves, and pockets...it lends itself to so many innovative possibilities.
 
We are only halfway through September and it has shaped up to being a very exciting month in the Close To My Heart world...firstly celebrating our founder and CEO Jeanette Lynton’s 30-year anniversary in the scrapbooking and stamping industry...with a FREE stamp set included in every order of $30 of more in current retail-priced stamps, the release of an exclusive new Cricut Collection and a gorgeous Stamp of the Month showcasing family love - be sure to visit my Online Shop and click on the Promotions tab so you don't miss a thing!
 
 
....and be sure to check back here on Friday when I bring you my 3rd instalment in the Friday Friend Feature series and some delightful little cards.

Friday, September 12, 2014

Friday Friend Feature #2

Today is also the 2nd instalment of my Friday Friend Feature...each and every Friday I will be featuring art work created by my Crafty Friends using Close To My Heart products. This art work will be created by consultants in my team, paper craft designer friends and others from my circle of scrapping and card making buddies - all have amazing talents and a love for all that is crafty...I know they will inspire you to use these wonderful products in ways you never would have imagined.

Today's crafty goodness comes from another consultant in my team who also happens to be my youngest daughter Larissa - she just loves making pretty handmade things!! Larissa is currently doing some volunteer work at a small rural Primary School and assisting and helping prepare items for their school fete. The date of this year's fete happens to fall on Halloween and this is the theme they will focus on. Larissa has been busy working with her students creating goodies to sell at their stalls and she has found Close To My Heart's Cut Above Treat Bag Kits perfect for this.


The Kits contain:
10 – 5" × 3½" × 13/8" Printed Treat Bags (5 each of 2 designs)
5 – 4" × 6" Sheets of ¾" Stickers
12 – 1½" White Daisy Circles
12 – 3-D Foam Squares
10 – 5" × 3¼" Cellophane Bags
and being pre-cut, ready to assemble make them ideal for the classroom and children alike. They can then be customised with ink, co-ordinating stamp sets and your choice of embellishments. The Treat Bags Larissa's class have made, feature an apt and very cute stamp set called Trick and Treat Sweets, it includes 9 images  - 6 are little characters such as this witch and cat. These treat bags were embellished with Black Shimmer Trim and White Enamel Stars.

The little pencil gift packs have also been a hit with the children. They have enjoyed playing with ink & stamps but also taking a sense of pride in their handiwork. These packs make great party favours too, simply combine with the Perfect Fit - Birthday stamp set to complete the theme. The Annual Inspirations Idea Book/Catalogue has another cute pencil topper idea on page 41 - don't forget this Idea Book is jammed packed with inspiring ideas...you can view it here or if you prefer a hard copy? I am happy to send one out to you -  email me at lotfam@iinet.net.au

 
Here is video from Close To My Heart that gives you a preview of some other great Cut Above Kits...


Remember that September is also National Stamping Month, and when you spend $30 on any current retail-priced stamps during the month of September, you qualify to receive the exclusive C-sized stamp set #30 Years of Happy for FREE! Larissa has used some of the images to create more pencil pack gifts which she will use as Student Rewards - tokens of encouragement and merit awards.... if you too are a school teacher then this a set for you!


I hope you have enjoyed today's Friend Feature, the Cut Above Kits and Larissa's handiwork - I'd love you to leave a message for Larissa in the comments section below and don't forget to check back in next Friday I have some lovely cards to share with you that were made by one of my Paper Craft Designer Friends.

Have a great weekend of Crafty Play!
 

Introducing the NEW Artfully Sent Cricut Collection

WOO HOO!! - Today, I have the most exciting news to share with you.... Close To My Heart have released the newest Cricut Cartridge to be added to their exclusive range of  Cricut Collections.

The new Artfully Sent Cricut Collection  is now available to order from my Online Store  simply click here. If you are a Card Maker or Cricut Crafter then this is the collection you have been waiting for.....cardmaking has never been easier or more fun! You will be able to make handmade masterpieces in no time at all. This cartridge has a card for any and all occasions—even if the occasion is "just because"!


Here is a little information about the Close To My Heart  Artfully Sent Cricut Collection to get you started.

- There is a full upper & lower case font - it is very cute with it's "curly tails"!
- 50 pop up cards with coordinating icons, shapes and phrases
- 50 interactive cards that create a scene with swing action, tri-folds and much more
- 100 quick and easy layered sentiment cards
- 100 sleeve and overlay cards  perfect for store gift cards (see video below)
- 100 card fronts that could be used as Picture My Life (or Project Life) cards
and best of all you can customise and make envelopes ( with liner ) to match and of course, all this can be co-ordinated to use with your traditional scrapbook pages - very cool indeed!!

Overall that is a total of 400 cards and a font!  - plus 3 exclusive and co-ordinating stamp sets and a package of  daisy white cardstock....awesome value!

Here are some sneak peeks of what you can do with this wonderful collection.


Check out this overview video, featuring some of the fabulous creations the Artfully Sent Cricut Collection can offer you!

 
...if you can't wait to get your hands on this new toy and "play"? -  you can order today right here at my Online Store  - all orders received before the 20th of September will also receive a bonus stamp set from me to you -  Happy Crafting!

Tuesday, September 9, 2014

Capture The Day

Today was one of those strange spring days where you get 4 seasons all at once. I woke to strong winds and dreary skies, by lunchtime the sky was blue and the sun was shining....then late in the afternoon we had thunder, lightning and lots of heavy rain...and through it all, I played happily in my "happy room"!!

It was so much fun getting inky, cutting, pasting and stamping...it has been a long time since I have had an uninterrupted day at home just playing with my crafting goodies... and I loved every minute of it! I also now, have a lovely collection of projects to share with you over the coming weeks - be sure to stay tuned!

In the meantime, I thought I would share a pretty little card that I hope brings some sunshine to your day.


The Butterfly image comes in the Capture the Day Stamp Set  and was stamped in Black Ink onto some background paper I created using a combination of 3 of Close To My Heart's new ink colours - Thistle, Pixie and Canary, some rock salt (yes, crafting goodies can be found in your pantry!) and a little water in my Spray Pen...it is such a cool effect. I will be teaching this technique along with a few other tips and tricks for creating background papers at my upcoming workshop events, locally and in Melbourne - contact me at lotfam@iinet.net.au for more information.

The sentiment was stamped onto some paper taken from the My Crush In the Pink Book as was the distressed pink piece of paper it was mounted onto. I know, I mention it time and time again, but the papers in the Close To My Heart product collection co-ordinate so well with one another...it truly is what endears me most to this paper craft range.

The Gold Shimmer Trim and Bling Gems added a little "sparkle & shine" to the card while the Scallop Border Punch and faux stitching with the Marvy Journalling Pen completed the overall design.

If you belong to my Card Kit Club this is the card that is making it's way to your letterbox this week - Enjoy!

Sunday, September 7, 2014

Father's Day Card

I'm not so good at creating "boy" cards...possibly something to do with the fact that I am such a pink flowery girl LOL! and I have been procrastinating over making my Dad a Fathers Day card for days - should it be blue? what themed stamps should I use?? would Dad prefer cars, boats, or something generic? etc etc. Then this morning, panic set in and I realised if I didn't come up with something soon - it just wouldn't be happening!

One of my favourite stamp sets from the Annual Inspirations Idea Book is the Seaside Greetings, it is not gender specific, therefore I thought it would be a perfect set to use for my card. Before stamping my lighthouse image I created a background using a dry paint brush and Glacier Reinker...then to add some colour variation  I mixed in a small amount of Flaxen Reinker and sponged some Desert Sand Exclusive Ink over the top - not sure I achieved the look I wanted, but it certainly took away the harshness of a flat white background. I was however, very pleased with how well the Christmas themed Snowhaven Paper Pack worked with my card design...once again proving how versatile the Close To My Heart product collection is!

The "postage stamp" style mat was cut from the Cricut Artbooking Cartridge, it was then adhered to the card with some 3D Foam Tape adding a touch of dimension....and phew! the card was finished, just in time for my lunchtime visit with Dad....and of course being my Dad, he loved it!!

Today was a lovely warm Spring day and we spent the day together taking a drive over to the Strathbogie Ranges for afternoon tea. I hope you had an enjoyable day celebrating Fathers Day too.


Friday, September 5, 2014

Friday Friend Feature

In my last post, I mentioned that Spring brings with it a time of excitement and renewal...and today, I bring that to you... with a brand new segment on my blog called the Friday Friend Feature - each and every Friday I will be featuring art work designed by my Crafty Friends using Close To My Heart products. This art work will be created by consultants in my team, paper craft designer friends and others from my circle of scrapping & cardmaking buddies - all have amazing talents and I know they will inspire you to use these wonderful products in ways you never would have imagined.

Today, I am introducing you to a long time crafting friend and consultant in my team - Veronica Wuthrich who has created two gorgeous cards using the Happy Birds stamp set...both are based on card sketches from the Make It From Your Heart idea books. The vibrant & fun colour palette Veronica has chosen, simply oozes happiness!


This card is a great example of the use of embossing - Versamark Ink and White Super Fine Embossing Powder really make the white floral images "pop"...a little more dimension was added by using the Hollyhock coloured cardstock from the Adventure Fundamentals Paper Pack and some 3D Foam Tape behind the images that Veronica coloured in with the ShinHan Touch Twin Markers.

....and I love how Veronica has paper pieced and highlighted the versatility of the Happy Birds stamp set on her 2nd card - how cool to use the feather image as a leaf - very clever!...and as you can see she is a great fan of dimensional elements in her art work. The frame embellishment was covered with Topiary Striped Washi Tape and comes from the dimensional elements included in the Artbooking Cricut Collection. The cardstock was stamped using the tone on tone technique with arrow images from the One Way Borders stamp set and the yellow and green printed papers come from the pretty Brushed Paper Pack.


....in celebration of Spring and my new blog feature, one lucky person will receive the Happy Birds stamp set for FREE - all you have to do is place an order in my Online Store or with me personally for a chance to win.


I hope you have enjoyed my new Friday Friend Feature and Veronica's lovely cards...I'd love it if you could leave a message or comment for Veronica below and I look forward to sharing some more inspiring art work with you next Friday!

Monday, September 1, 2014

September Stamp of the Month

Today is the first day of Spring and my all time favourite time of the year. I can't really explain the feeling, but I get a real sense of excitement, renewal and passion when my calendar clicks over to the 1st of September. This month is particularly exciting in my Close To My Heart world too - it is that time of the year when we celebrate National Stamping Month and to honour our founder and CEO Jeanette Lynton’s 30-year anniversary in the scrapbooking and stamping industry...I have an exclusive stamp set to offer you. It features 30 mini images/sentiments perfectly suited to 30 days of stamping happiness - something for every occasion! Spend $30 on any current retail-priced stamps during the month of September with me or in my Online Shop and you qualify to receive the exclusive stamp set for FREE!!


This purchase also counts towards your qualifying order for this month's sweet Stamp of the Month set - Family is Forever -   simply place a $75 order and you can add both sets to your craft collection for just $5 -  absolutely amazing value for money!!


This is a delightful stamp set with nice large images and titles, perfect for your scrapbook projects and card projects alike. I especially love the heartfelt shape of the tree and it was this image that I chose to highlight in the card I am sharing with you today.

I decided to stamp the image using cocoa Pigment Ink - pigment inks are a little more intense in colour, making them ideal for page titles, sentiments or images that you really want to pop. I then embellished the heart features of the tree with some paper piecing... using the blue & white dotted paper design from the Wanderful Paper Pack and some little Red Enamel Hearts. I thought the red and blue colour combination gave my card a warm cottage feel and I selected an assortment of other papers in our product range to further enhance this theme. The red floral paper was a left-over card from my Picture My Life - Pear & Partridge Scrapbooking Kit and the newspaper style print came from the My Crush In the Pink Book - I am totally addicted to using the My Crush Books as a paper source! The cocoa paper is from the Basics Fundamental Assortment it comes with 20 double-sided 12" × 12" sheets (2 each of 10 designs) -  same design on both sides, one side with a glossy resist pattern and the other a matt surface. I used a combination of both sides for this card. I also used the Scallop Border Punch to add a subtle border and contrast to the card design.

If you have any questions about this month's Stamp of the Month or the 30 Years of Happy stamp set, please feel free to message me at lotfam@iinet.net.au or if you would like to see more art work using the stamp sets click here.