Showing posts with label Stamping. Show all posts

Monday, March 28, 2016

Atlantic Hearts Sketch Challenge - #153

Once again I am joining the sketch fun over at the Atlantic Hearts Challenge Blog...


This week the card shape is square and I really enjoyed playing with this format. It has been quite awhile since I have created a card in a shape other than rectangle. I based my card around the stamp sets and cluster design I shared in my last blog post (you can find it by clicking -  here). I love how you can use the same stamp sets time and time again and by changing the colour palette come up with lots of different variations.


I basically followed the sketch design cutting 1/4" strips of paper to create the striped look depicted in the sketch. The pink and mint coloured papers were taken from the paper/pages in the
My Crush Everyday Life Pages. I especially love using these as a paper source and use them regularly to compliment my other paper packs. The sentiment comes from the Friend in Me stamp set and the background splatter was created with the Ink Blot stamp set  - using the 2nd generation stamping technique in  Black and Cotton Candy Ink. The flower and leave images...found in the Springtime Wishes and  Friend in Me stamp sets... were stamped in black ink on a combination of papers from the My Crush Everyday Life Pages, Regatta and Penelope Paper Packs. Although, some of the flowers and leaves were cut from the printed designs found on the My Crush Everyday Life Pages. They were then fussy cut and arranged in a cluster with some Foam Tape behind the larger flower to add some dimension. A paper bow from the Gold Fundamentals Assortment added just the right finishing touch.

Now, is the perfect time to add these 3 stamp sets to your collection. During the month of March...(and yes, we only have a few days left!) - when you purchase two stamp sets you get a third set for free - that is a saving of $21 on the 3 stamp sets used in this card design and exceptional value for money especially knowing you can use them over and over again. To find out more about this offer simply click here!

Thursday, March 24, 2016

One Design - Three Different Ways.

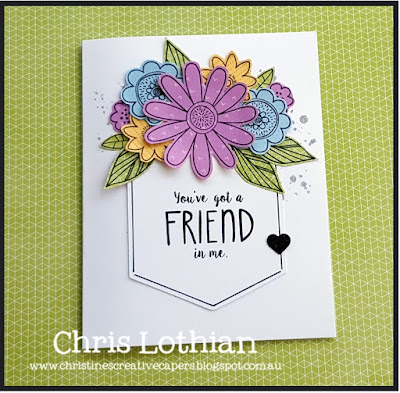
Inspired by the cover of the current Seasonal Expressions catalogue/idea book I created this sweet little card, that I have labelled as a "pocket full of friendship".


It uses three of my favourite stamp sets - Springtime Wishes, Friend in Me and Ink Blot. The floral images were stamped onto papers from the Georgie  and Penelope Paper Packs and arranged in a bouquet above a pocket shape cut from the
Cricut® Artistry Collection. The pocket was cut from White Daisy Cardstock, stamped with a sentiment and outlined with a Black Pen. The card design came together very quickly and I was super please with the end result... so what do you do when you have a fool proof "recipe" ? - you "cook" it again!!

The two versions below were stamped in Black Memento™ Ink then one was coloured with Watercolour Pencils and the other in a distressed Watercolour Painting technique using the same colour palette.


Then I repeated the paper pieced version in a slightly different colour palette...fun, fun fun!!


If you would like to recreate this card yourself then now is the perfect time to add these stamp sets to your collection. During the month of March when you purchase two stamp sets you get a third set for free - that is a saving of $21 on the 3 stamp sets used in these card creations and exceptional value for money especially knowing you can use them over and over again. To find out more about this offer simply click here!


Wednesday, December 9, 2015

Holiday Greetings

Like all Aussie's I dream of a White Christmas or least the opportunity to experience one...there is something very magical about snow scenes at Christmas time and I have created my own! Yes, yesterday as I was finishing the very last of my Christmas cards ( yay-me!! ) I decided to make a special little Holiday Greeting card depicting a snow scene and the cute little woodland critters from Close To My Heart's Miracle of Christmas Stamp Set.


I used a combination of different techniques to create the scene, sponging, colouring, random stamping, paper piecing and paper tearing. The background was sponged in Sapphire and Glacier Exclusive Inks™ and then in White Pigment Ink I randomly stamped an image from the Ink Blot Stamp Set to represent falling snow. I then hand tore strips of White Cardstock and layered them in the foreground. The cute fox and bear images were stamped in Cocoa Exclusive Ink™ onto white card stock and patterned papers found in the White Pines Paper Pack and the Picture My Life™ White Pines Scrapbooking Program multiple times then I fussy cut out features such as clothes and scarves. I used the ShinHan™ Touch Twin™ Clay Marker and the ShinHan™ Touch Twin™ Carmine Marker to add details to the noses, cheeks and ears. The scene was then matted onto some Kraft Cardstock before adhering to the card base. It was so much fun working on this card and using colours other than the traditional red and green.

I have really enjoyed creating cards with these little critters this holiday season and the Ink Blot Stamp Set is an all time favourite. Here is a little peek at some other cards I created using both these sets and similar techniques.


Both stamp sets are available to purchase in my Online Shop you can order online and have your goodies sent directly to your door or if you would like me to place your order and have it delivered to my workshop events simply email me at lotfam@iinet.net.au


 Off now to end out into a hot Summers day to post of my Christmas cards - check your letter box one may just end up your way!!

Wednesday, November 25, 2015

Creating Live!

I spent last weekend along with thousands of other crafters around the world, tuned into a live 2 day broadcast featuring all things Close To My Heart. It was so inspiring and well worth the 3am starts so I could watch this event unfold in real time. I can truly say it was one of the best creative learning experiences I have had for some day. It was a credit to both the Home Office team and the wonderful consultants who planned and participated in the event....I was so inspired!!

I hit my craft room the minute the broadcast finished on the first day and created 2 cards inspired by what I had seen... and techniques that I simply had not used in a long time.

During the scrapbook segment we were shown a gorgeous layout embellished with ink sponged die-cut shapes from the Cricut® Artistry Collection and other leaf and flower shapes cut from the Basic Fundamental and La Vie En Rose Papers. The layout became my inspiration for this card...my flowers were sponged in Hollyhock and Canary Exclusive Inks™  and the splattered background was inked in Black ink using the 2nd generation stamping technique. This splattered background comes from one of my favourite stamp sets called Ink Blot - there are 7 fun images in this set that are ideal for backgrounds and highlights in any paper craft project.


I used the same design elements for this card and it also uses the 2nd generation stamping technique along with base & shade stamping. The flower images were stamped again in Hollyhock and Canary Exclusive Inks™ with the additional flower stamped in Sorbet Exclusive Ink™.


The flower images came from the Blossoming Expressions stamp set (pictured below)...it was designed as a 2 step process stamp set, meaning it has base and shade elements. To create this card I used the 2nd generation ink as my base and then using the shade /or overlay image I stamped over the top of the base in 1st generation ink. However, there are endless other creative processes you can use with the Blossoming Expressions stamp set...which is one of the reasons it has fast become my most used stamp set of late, you can see another of my creations featuring it here ... and the full stamp set is pictured below.


The thank you sentiments on the cards came from 2 different stamp sets - that also get a lot of use in my collection! - Australian Thanks and  A Thousand Thanks.

I have good news for those of you who would like watch the broadcast from the CreativeLive classes shared this past weekend -  you can now access them for FREE by clicking on this link. I have no doubt you will be inspired by what you see, as I was - Happy Crafting!
 

Sunday, October 25, 2015

Convention 2015 - Make It From Your Heart Part 3

In my last post I promised to share a few more of the layouts that featured in my presentation at the Australasian Close To My Heart Convention.

I certainly don't scrapbook as much as I use to when my children were younger. I also don't to take my SLR camera with me everywhere (as I once did), I now tend capture those little moments of my life on my smart phone. The majority of the layouts I create today represent this... they comprise of a single photo and cluster decorating.

This layout is a quick snap shot of my daughter and niece. The page design was inspired by the colours in my niece's dress.


I used papers from the Whimsy Paper Fundamental range and Kaleidoscope Paper Pack. The floral cluster was created using the images from the Blossoming Expressions stamp set...stamped in the following colour inks Canary, Sorbet, Glacier and Lagoon. The white cardstock leaves were cut from the "new" Cricut® Artistry Collection and the cute little sentiment sticker verse & "best buds" chipboard embellishment can be found in the Kaleidoscope Complements Pack. A few Enamel & Glitter Duos Blue Dots and white enamel dots from the Grey Enamel Gems Pack were used to finish off the cluster arrangement.

This 2nd layout is one of my favourite photos taken when I was attending meetings in Utah serving on the Close To My Heart Product Strategy Committee. I loved sharing time with these like minded ladies, they are not only great work colleagues but they are an awesome group of life long friends.


This layout also uses a combination of different products from the Close To My Heart product range including Zoe, Kaleidoscope and Urban paper packs. The floral cluster arrangement for this layout uses stickers and chipboard from both the Kaleidoscope and Zoe Complement Packs. The "selfie" title was created using the white mini alphabet stickers from the Fundamental Stickers Basics Pack. The scallop border trim was cut from Pixie Cardstock using the Scallop Border Maker and trimmed with some of the Silver Foil Trim.

I can't "sing the praises" of the Close To My Heart product range enough, everything is so complimentary and it makes mixing and matching different papers, stickers and embellishments all in one layout so very easy indeed!!

All the products listed and highlighted here, can be found in my online shop - click here to create your order and have it sent directly to your doorstep!

Thank you for stopping by my blog. I would love to hear your comments on these single page layouts and I hope you are yourself enjoying a fun-filled crafty weekend.

Friday, September 25, 2015

Hello Darlings

....have you missed me??? I know I have missed you and my craft room! Sadly, I have spent the past few weeks laid up with a nasty flu and sinus infection - not much fun at all!! However, I am happy to report I am on the mend and the lovely spring weather, along with my blossoming garden, has put a smile back on my face.

This is a pic of a dwarf cherry tree blossoming in my front garden - it is very pretty... so you can see why I am smiling!


I have managed some "playtime" in my craft room this week too... and I hope this card I created for a sassy girlfriend brings a smile, if not a giggle, to her day.


I combined a few of my favourite new "pink" products from the current Annual Inspirations Catalogue to make this card and I love how well they all worked together.

The glossy accented black background is from the new Paper Fundamentals Basics. The pink striped paper can be found in the Kaleidoscope Paper Pack, the black striped paper with the Hello Darling sentiment is actually a Picture My Life™ card...  from the gorgeous new Beautiful You collection. It was embellished with some Pink Enamel Gems then I added a further sentiment - "Shine On You Crazy Diamond"  - that can be found in the Diamonds Are Forever stamp set . The little pink diamond in the centre of the sentiment is one of the stickers found in the Kaleidoscope Complements pack. You really need to check out all the new revamped Complements packs - they are amazing value for only $9.00  this pack contains the following: 2 – 6" x 6" Coordinating Sticker Sheets, 1 – 6" x 6" Thin Plastic Sticker Sheet (looks like vellum on your pages) and assorted Chipboard Die-Cuts. Each of the My Reflections™  range of products has a co-ordinating Complement pack and they are jammed packed with a variety of embellishments, vellum, kraft, chipboard and plastic die-cuts along with sheets of cute stickers - click here to browse through the collection.

Close To My Heart have had some great stamp sets available only during September for National Stamping Month and as there are only 5 days left for this promotion don't forget to place your orders - you can order by following this link to my Online Store - also head on over to my Facebook page and scroll through the posts featuring some of the beautiful art work created with these sets. They simply are a "must have" and as an added bonus... anyone who places an order over the weekend  (26th-27th September) will go in the draw to receive an additional stamp set - a gift from Me to You!!

These are the 3 sets available:


 I hope you have had a great week too and your weekend is even better!

Happy Crafting!

Chris x

Sunday, July 12, 2015

Rainbow Card

I am not a great fan of winter and as I mentioned in my last post the weather here has been bitter! The cold snap we are having has also resulted in a string of dark rainy days. Melbourne even had it's wettest day since 1990 today. While I am happy to be out of the rain and indoors crafting, I really would love to see some brighter days ahead... but as the saying goes "you can't have a rainbow without a little rain"

The card I am sharing with you today, has a touch of my much needed sunshine and plenty of rainbow! The card design was built on a Kraft Cardstock base which really made the colours pop.


I created this card using the Rain and Shine Stamp Set (pictured at the bottom of this post). The sun was made using a shape from the Cricut® Artiste Collection cut from Canary Cardstock and the stamped image in the centre was inked in Canary Ink and cut into a circle. The clouds were created using the base and shade technique in Crystal Blue Ink and given a fluffy appearance by sponging small areas with White Daisy Pigment Ink. I used Silver Sequins to represent raindrops and a combination of rainbow coloured papers from the Paper Fundamentals Whimsy Assortment trimmed with a scallop edge of White Daisy Cardstock for my rainbow strip.

The Fundamental Paper packs are fabulous to use as foundation colour for any project, each pack contains 20 double-sided 12" × 12" sheets (2 each of 10 designs) - the same patterned design on both sides, one side with a full colour glossy resist. If you are a fan of this range ( as I am! ) I can let you in on a little secret. I have heard a whisper from our US Convention, that this range has some awesome additions coming it's way on the 1st September... so make sure you stay tuned.

In the meantime, check out the list of  products in the Retiring Items and While Stocks Last sections of my Online Shop - there are some wonderful products in both lists that I know you won't want to miss having in your craft collection.


Tuesday, May 19, 2015

Bold, Bright and Beautiful

The weather here over the past week has been wet, dark and gloomy so I have been cheering myself up by playing with an array of bright and beautiful papers in my craft room!

Have you ordered your Taste of Summer paper pack and stamp set yet? They are a limited edition and only available in May - don't miss out! - you can order them here in my online shop.


I created this sweet strawberry card using both the papers and the stamp set from the Taste of Summer range...


I teamed the lovely bright papers with the one of my favourite paper packs - the Paper Fundamentals Whimsy Assortment...I love the embossed texture of these papers. I topped my strawberries with leaf and flower shapes from the Cricut® Artiste Collection and I think this gave them a more realistic look ... and of course no strawberry patch is complete without a busy little bee. The bee image can be found in the Happy Everything stamp set... a portion of the proceeds of this set go direct to Operation Smile and can change the life of a child. Since 1982 Operation Smile has performed over 220,000 surgical procedures to correct facial deformities in children - life altering surgeries that give bright, beautiful futures to these children.

This card also uses one of the sentiments from the Happy Everything stamp set. It certainly is a "must-have" set for your crafting collection.


An Embossing Tool was used to give the floral embellishments some definition they were also Sanded, exposing the white core of the cardstock...  adding an element of texture to the overall card design... the embossed background was created with the Dot Embossing Folder.

Thank you for visiting my blog today - I hope your week is full of bright beautiful days!


Wednesday, January 14, 2015

Home is where the ART is...

Inspired by a post from Close To My Heart's Make It From Your Heart blog highlighting "She Art" and the sweet little 6 x 6 Display Canvas I decided to try some mixed media crafting myself. It is so much fun combining stamps, papers and ink in a non-traditional way...  that it is very easy to get addicted. Today, I am going to showcase one of the projects I have made...  and be prepared to find more mixed media blog posts from me in the future!!

To create my Home Décor project I simply cut a 6 x 6 square of paper to use as a base and built my design from there. My square was cut from the newsprint style paper from the Heartstrings Paper Pack. I used a combination of 4 different paper packs to create my scene - Hopscotch, Brushed, Snowhaven and Heartstrings. Most of the paper piecing was created using some of the new stamp sets featured in the Seasonal Expressions Idea Book/Catalogue. However, the house was cut from shapes using my Paper Trimmer and Scallop Border Punch. I didn't use a pattern of any kind I just cut the basic outline of a house...  along with roof, door and windows until I had a design I was happy with.Creating the clouds was one of my favourite parts of this project. I LOVE to get inky! Using the stamp set Rain or Shine and the base & shade stamping technique I was able to create clouds with texture. I stamped the base shape stamp in Crystal Blue Ink then the outline shaped stamp over the top in Black Ink . Next I dabbed some small dots of White Daisy Pigment Ink into the centre of the cloud shape... as this ink is more dense in consistency it gave the clouds a "fluffier" appearance.

To give the design a touch more of a whimsical look, I added faux stitching and doodling with a fine tip journaling pen (.5mm)... I used the  Marvy® Uchida® LePen™ . The quote was computer generated and printed on White Daisy Cardstock. I took the quote from page 163 of the Annual Inspirations Idea Book/Catalogue - I thought it was just perfect for my little house creation! You will find the My Creations 6 x 6 Canvas Display featured on this page too!

Everything was adhered to the base with Bonding Memories Glue Pen and I used the larger Bonding Memories Glue to add this base to the canvas rather than Mod Podge®
To seal my design I sprayed some Matte Finish Lacquer ( the type Folk Artists use ) over the entire finished piece.

I have also given you a "sneak peek" of February's Stamp of the Month called "A Happy Hello" ... I used it to stamp the leaves. This stamp set would be ideal for creating mixed media gardens - take a look at the complete set at my online shop. I suggest getting your wishlist together now so you can purchase this set at the discount price of $5 once the calendar ticks over to the 1st Feb!!

Projects such as this canvas, are a great way to use your leftover scraps of paper and let your creativity flow... give it a try I am sure you will LOVE the results!


Friday, September 26, 2014

Friday Friend Feature #4

Welcome to Friday Friend Feature No. 4 -  each Friday on my blog I have been featuring art work created by my Crafty Friends using Close To My Heart products. The art work comes to you from consultants in my team, paper craft designer friends and others from my circle of scrapping and card making buddies – all have amazing talents and a love for all that is crafty… and I know they have been inspiring you to use these wonderful products in ways you never would have imagined.
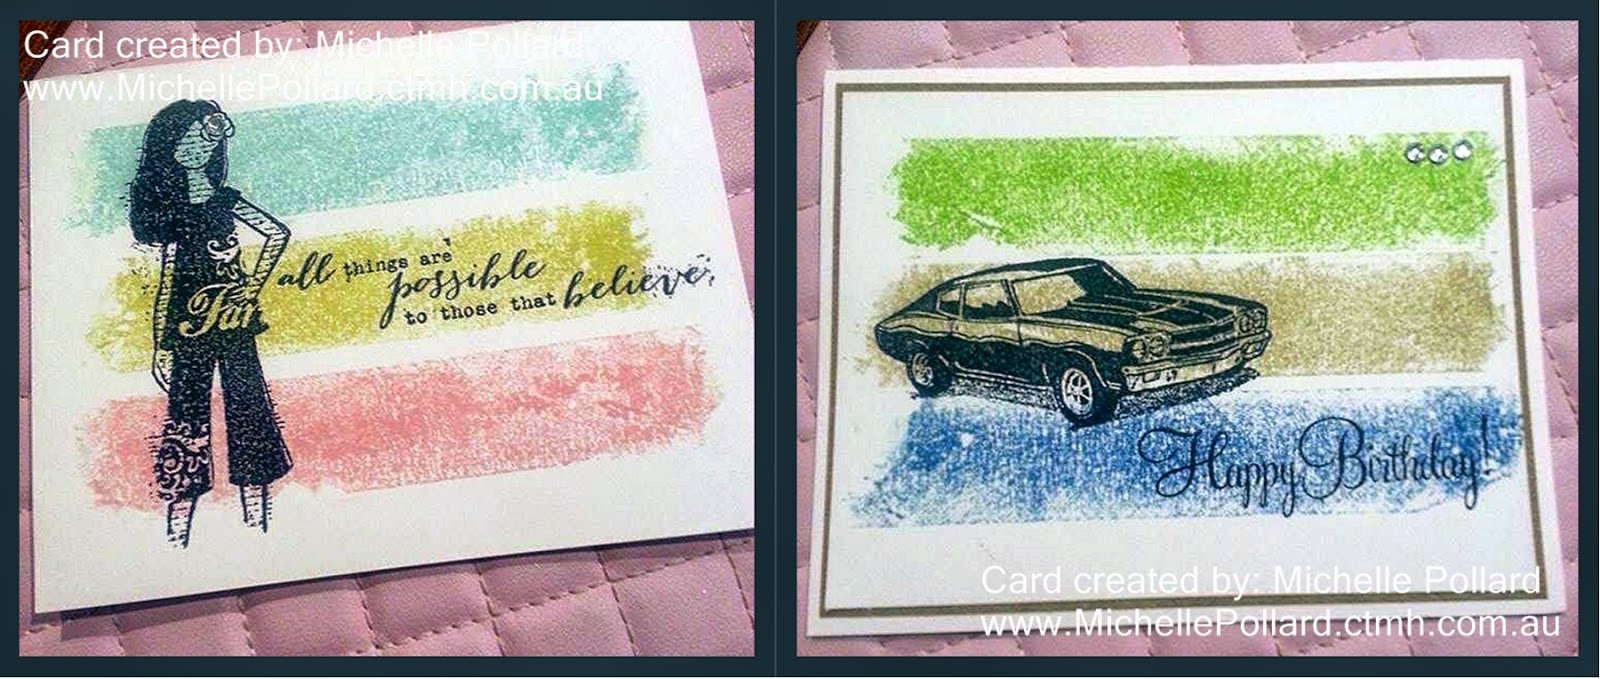
The cards I am featuring today were made by Michelle - a very dear friend and consultant in my team of Crafty Chicks. Michelle's cards showcase the "masking tape" technique... which is very much on trend in the card making world at the moment. Michelle describes it as a "simple yet effective technique" and as you can see the stamped images make a huge impact when showcased in this way.
Michelle has used the Dreamer and Maximum Power stamp sets along with the Happy Birthday sentiment from the Cricut Art Philosophy Collection on these cards. The Dreamer card features 3 of the new ink colours in the Whimsy Colour Palette - Glacier, Flaxen and  Pixie....while the Happy Birthday card uses Pear, Cashmere and Indian Corn Blue. You can check out the full range of exclusive ink colours in the Close To My Heart range here in my Online Shop with 42 co-ordinating colours to choose from, there are so many combinations you can use to create these simple but stunning style of cards. If you would like to learn some fun techniques for your paper craft projects join us for a Crafty Day Out - you are always welcome.

Have a great weekend and don't forget to leave Michelle a message in the comments section below - I love hearing your thoughts on the art work showcased on my blog.

Tuesday, August 26, 2014

...More Embossing Fun

In my last post I mentioned "wet" and "dry" embossing and I received a few emails asking if I could explain more. There is nothing really special about this technique it is simply combining Embossing Powders and Embossing Folders together in the one project...as illustrated in the Friendship card I have created below.

I combined the Dot Embossing Folder with the Clear Super Fine Embossing Powder which created a "wet" ocean look appearance to my cardstock. The shells were made using the Princess Gold Embossing Powder, Flaxen & Glacier Exclusive Inks and the Emboss Resist technique. Love all the different textures, they certainly add interest and dimension to a simple card design.

I used the Clear Super Fine Embossing Powder and the Emboss Resist technique to create another card using the lovely Seaside My Reflections Scrapbook Products by Close To My Heart...very cool to be able to make personalised cards from my leftover scrapbook papers.

The larger shell was stamped onto Colonial White Cardstock with VersaMark Ink, embossed with Clear Super Fine Embossing Powder... then Sorbet Exclusive Ink was applied over the top. I used a thin strip of Teal Glitter Paper and a star fish antiqued-gold metal shape from the Seaside Assortment to add a little "sparkle & shine" to my card. There are 6 adhesive backed shapes in this pack including the large fish shown in the card at the top of this post...they are the perfect finishing touch.

Embossing materials and tools are all available from my Online Shop  just add them to your shopping cart, enter your payment details and your goodies will be delivered direct to your home - all very easy & convenient! I also offer technique based craft classes in my home (or yours)... where you can earn sales based rewards (stamp sets, papers etc) - simply contact me at lotfam@iinet.net.au to schedule your class.

If you are attending the "Come Create with Chris" event in Adelaide this weekend?... you will find a little more embossing fun on the agenda - looking forward to sharing this technique with you.

Tuesday, August 5, 2014

Easy Peasy - Stamp of the Month Card

Today I wanted to show you the versatility of this month's Stamp of the Month - it is not all about cute Owl images and Halloween themes! As many of you know I am a flower making addict LOL! and instantly I saw petal, leaf and flower shapes in many of the images showcased in this stamp set. Highlight these images with the new Brushed Paper Pack and you have a totally different themed card. This card was "super easy"  to create I simply followed one of my favourite sketches ( you will find it here ). I then added some random stamping in Hollyhock Ink to my Hollyhock Cardstock for a lovely tone on tone look, a sweet sentiment from the A Budding Friendship stamp set and a little paper piecing and the card was done! - Easy Peasy!!


The paper pieced flower was created by stamping 8 petal/wing shapes from the What A Hoot stamp set in Black Ink onto a small piece of pink patterned paper, taken from a page in the My Crush - In the Pink Book - each petal was then fussy cut using my "all time favourite"  Micro-Tip Scissors then arranged into a flower shape and adhered to the card base. The centre of the flower and the leaves were cut from the images in the large floral design paper in the Brushed Paper Pack - I love the primitive hand-painted look of this paper. I then did some faux stitching using the Marvy Fine Tip Pen just to add that finishing touch.

If you would like to create your own floral embellishments with this stamp set? - simply place a $75 order in my Online Shop and you can purchase this set for just $5 - absolutely amazing value for money - this set contains 17 different images with a variety of applications!


Sunday, June 1, 2014

Celebrating with a "Kaboom"

Today is wet, dark and miserable -  very much what you would expect for the first day of Winter!...however, I am going to celebrate June with a bright, cheery KABOOM! and introduce you to this month's Stamp of the Month from Close To My Heart. This stamp set is jammed packed with 16 images that will add a sparkle to any project - exceptional value at only $5 when you place a $75 order with me or in my online shop.


I decided to combine these images with some of my favourite Aussie Themed stamp sets  and create cards for a variety of different celebrations. The images depicting bursts of fireworks are ideal for random stamping techniques and I love creating my own unique paper patterns this way.


I carried the random stamping technique through to the paper pieced balloons too and I like how well it all co-ordinates....and seeing I was on such a roll random stamping my cardstock, I went ahead and used it as a feature for my "job well done" card.

It was so much fun to create this card and combine some modern day slang with some good old fashioned Aussie colloquialism - such high praise for the recipient!! The jagged circle shapes were cut from the Art Philosophy Cricut Cartridge layered together and added to the card with 3D Foam Tape to add some height & dimension. The sentiment arrangement was trimmed with a scallop edge using the Scallop Border Punch ...which truly is one of my all time favourite tools!

I am starting to get very excited about my trip to the USA this month, where I will be attending the Close To My Heart annual convention. I can't wait to meet all my new found crafting buddies/colleagues and celebrate everything Close To My Heart with them. I will also get to celebrate the 4th July while I am there, so it seemed appropriate to create a card for this special holiday.


I kept to the Red, White and Blue theme and added a little depth and texture to the card using the Dot Embossing Folder on the white cardstock...and as you can see, there is even more random stamping on my little pennant flags. The flags were cut and created using those awesome little micro-tip scissors.

I'd love to show you these cards and some of my other creations using this month's Stamp of the Month - please feel free to contact me and we can organise a stamping "play-date"!

I have had a number of emails requesting tutorials and " the how to" for my paper flower creations and the pocket fold gift card card  - you will be happy to know, I am working of this and hope to have the first of these tutorials posted here within the next week...thank you for your patience :)

Wednesday, May 28, 2014

Floral Creations

If there is such thing as a Paper Flower Addiction - then I am a self confessed addict!! I love creating customised flowers for my crafting projects and the Close To My Heart Cricut Collections make it so easy. There are numerous flower shapes included in the cartridges and with a little ink, some dimensional elements and a few basic tools you can turn them into unique 3D embellishments which will make your projects shine!

Today, I am sharing two of my most recent floral creations with you....I love adding depth & texture to flat cardstock shapes and watching them come alive!


The Piercing Tool Kit and the Bone Folder are my most recommended tools for anyone wanting to create flowers, they simply are a "must have" and can be ordered direct from my Online Shop. I added some glitter to my Pink flowers along with some glossy accents using Liquid Glass. Then added Flamingo Dots and Ivy Lane Complements for that finishing touch.


The Blue flower became the feature element on my Thank You card. The leaves were cut from the Art Philosophy Cricut Collection and again dimension was added using my trusty Bone Folder! This card was all pieced together with another of my favourite Close To My Heart products - Bonding Memories Glue - you really must have this in your crafting tool box too! -  it is a great adhesive with many different applications.

If you are attending the "Come Create with Chris" events in Sydney next weekend... I will be demonstrating how to make these charming little flowers - need more information on these events? - click here - I'd love to have you come "play" with me!

Friday, May 16, 2014

Another Stroll Down Ivy Lane

...yes, I am featuring the lovely Ivy Lane range of products again in today's blog post! I love the pretty colour palette which includes subtle pinks, smokey plums and lovely florals. It was the first range I reached for when I created my little Hip Pics family "brag book". This handbag sized album was created in just over an hour and includes some of my most treasured photos.

The album title was created using the Cricut Artbooking Collection and the woodgrain background paper came from the wonderful Timberline Paper Pack. It is such a versatile paper that has so many fun applications...experimenting with the direction of the grain can really change the appearance of your artwork. The album has 16 pages and is designed for 4 x 4 photos. This is a little "peek" at a few of the pages.


I stamped all the Blush and Hollyhock cardstock with the wire image from the  Distressed Backgrounds stamp set... just to add some texture and then sponged the edges with Blush Ink to add depth. I really enjoyed making this quick and very easy project and I will be sharing this (and another version using the Skylark papers) with some of my papercraft buddies tomorrow at a National Scrapbook Event. If you would like to create one for yourself or would like to gather a group of friends together and schedule a Project Class I would LOVE to show you how!!


Thursday, May 1, 2014

Pretty in Pink

It goes with out saying that my favourite colour is Pink and one of my favourite Close To My Heart paper packs is from the Ivy Lane range. It has become my "go to" pack when creating cards that need a feminine touch. I thought today I would share a few of these cards with you.
 
 I love how this card came together  using a combination of left over papers from my Ivy Lane Card Making Kit including the lovely Sequin Dot Assortment - which is only available in this kit! I combined a few different stamp sets together too, including the leaves that come from the exclusive stamp set found in the Jubilee Scrapbooking Kit - it is great to get so much value for money from my kit purchases.
 
The shimmery appearance of my stamped flowers was created by adding a little Pearl Paint with some Blush ReInker and water and applying over the top of my flowers using a Spray Pen - love playing with these goodies, it is a lot of FUN! I got a little more creative and adventurous with this technique on my next card and used the technique to create my own unique background paper.
 
 I sprayed the Daisy White Cardstock with Cotton Candy ReInker and a little water. Then using the Damask Embossing Folder I ran it through my Cuttlebug Embossing Machine - then sponged some Smokey Plum Ink over the top...it took away the brightness of the white cardstock, the added colour making it tone in more harmoniously with the paper pack.
 
This Friendship card again uses a combination of paper packs and stamp sets including this month's Stamp of the Month - You've Got a Friend in Me.
 
 
I used my ever trusty Corner Rounder and Scallop Border Punch to add some decorative elements and added some finishing touches using Sparkle Flourishes and a small button from the Babycakes Assortment.
 
There are 5 Fun Friendship sentiments included in the  May Stamp of the Month which can be purchased for $5.00 when you place a $75 order this month...making them just $1.00 each - at that price - what a great value packed addition, they will be to your stamp collection!?! To order your set this month simply place an order in my Online Shop 
 
 
Wishing all my friends a very "Happy Month of May" - make mine happy too and leave a comment below - I love hearing from you!